Setting Up a Node & TypeScript Project - Configure Jest
Published on
As many of you know unit testing is a very opinionated topic in software development. Most of my professional experience has been working on code bases where little to no unit testing was implemented. This can/has been a nightmare especially with semi-large, messy code bases. It becomes like a game of whack-a-mole where you change one thing and eight other things break (this is also partly due to not following DRY or SOLID principles). This has sparked my interest and led me down a path towards unit testing. I recently began write tests for my own side projects. You can think of unit tests as write code to test your code at a function/method level. Given a specific input, the method should produce the expected output or side effect. By writing unit test, you can catch bug early before anything is deployed to production.
The unit testing framework we are going to setup with our project is Jest. Jest is a unit testing framework developed and maintained by Facebook. If you have not already setup the initial base project in part 1, you can always clone this github repository.
Prerequisites
Setting Up Unit Testing With Jest
To setup Jest with our project we will need to install three dev dependencies.
npm install --save-dev jest @types/jest ts-jest
Next we will generate our jest configuration (jest.config.js) and create a directory to hold our tests.
npx ts-jest config:init      # Creates a jest.config.js file
mkdir test                   # Creates our test directory (at the same level as src)
The ts-jest command creates a jest.config.js configuration file for us. We need to add an additional option to that file to tell Jest where to search for our tests. By default Jest will search recursively throughout the whole project for test files. Lets open up jest.config.js an add a testRegex property.
module.exports = {
  preset: 'ts-jest',
  testEnvironment: 'node',
  testRegex: 'test/.*\.test\.ts$'
};
The testRegex we added tells Jest to look in the test/ directory for any file that ends with .test.ts. You can read more about Jest configuration options here. We now need to update our package.json file with an npm script to run Jest.
{
  ...
  "scripts": {
    "test": "jest",
    "start": "ts-node src/index.ts",
    "build": "tsc"
  },
  ...
}
Now lets update our src/index.ts and create a simple test. We will create a basic sum(...) function to add two numbers together and return the result.
// src/index.ts
export const sum: Function = (a: number, b: number): number => a + b;
We will create our test file test/sum.test.ts (you can run touch test/sum.test.ts to create the file).
import { sum } from '../src';

describe("sum.test.ts", () => {
  it("should add two inputs together and return", () => {
    const val1: number = 5;
    const val2: number = 2;
    const expectedSum: number = val1 + val2;
    const result: number = sum(val1, val2);
    expect(result).toEqual(expectedSum);
  })
})
We can run our tests with npm test which should produce the results below

Jest Code Coverage
One nice thing about Jest it that it come with a lot of really nice built-in features, one of which is a coverage report. For more information on how to read a coverage report, you can reference this stackoverflow response.
Since the coverage report is already built into Jest, all we have to do is create an npm script to run the report. Open up package.json and add a coverage command to your scripts.
{
  ...
  "scripts": {
    "test": "jest",
    "coverage": "jest --coverage",
    "start": "ts-node src/index.ts",
    "build": "tsc"
  }
  ...
}
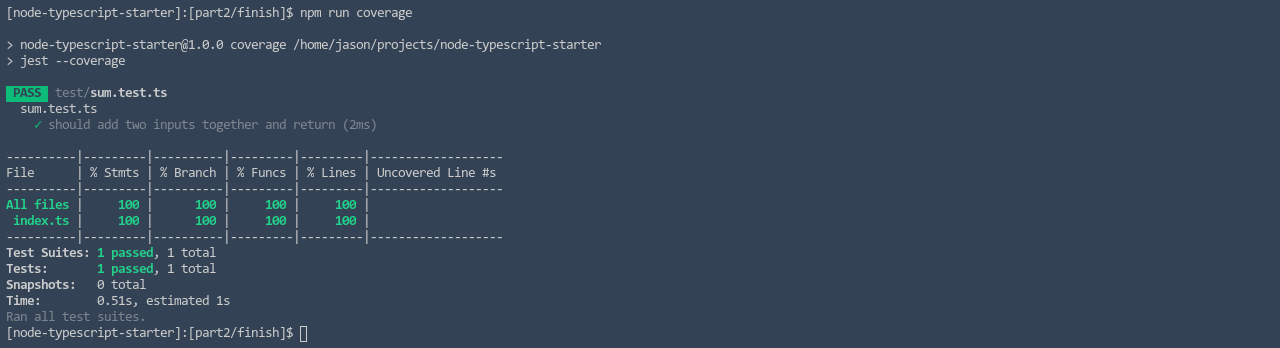
If we run npm run coverage, a coverage/ directory will be created with reports, along with outputting a simple report to console.
We don’t want to commit our coverage report directory to our repository so we will have to update our .gitignore
dist/
node_modules/
coverage/
Remember to stage and commit our changes to your repostiory.
git add .
git commit -m 'add jest for unit testing'
The completed github repository can be found here
More Posts
- Setting Up a Node & TypeScript Project - Initial Setup
- Setting Up a Node & TypeScript Project - Configure Jest
- Setting Up a Node & TypeScript Project - Configure Tooling
- Setting Up a Node & TypeScript Project - Setup Express
- Setting Up a Node & TypeScript Project - Setup DB & ORM