Setting Up a Node & TypeScript Project - Configure Tooling
Published on
Something that I’ve noticed while working in the JavaScript ecosystem is the vast number of tools available to developers. Being a relatively new developer, this was very overwhelming at first. Fortunately, the majority of them are easy to setup and once you have them setup you won’t need to make changes to them frequently. Some of these tools allows for faster, more consistent development. With this next post we will be configuring some common tools used in Node/JavaScript development.
Prerequisites
- Setting Up a Node & TypeScript Project - Initial Setup
- Setting Up a Node & TypeScript Project - Configure Jest
- OR Clone this github repository
Setting Up Linting With Eslint
When working with other developers, each developer may have a specific code formatting style that they follow. A simple example is one developer might use single quote while another might use double, or event the infamous tabs vs spaces debate. Linters/linting provides developers a way to enforce style standard/guidelines across a codebase to ensure all code is formatted/styled in a specific way regardless of a developer’s personal style.
We are going to setup eslint and prettier to format/style our codebase by running a npm command. Later we’ll setup husky and lint-staged to tie into git hooks and run our linter pre commit.
First we need to install our dev dependencies. With eslint/prettier there are quite a few. Refer to the provided table for explanation of each dependency.
| Package Name | Description |
|---|---|
| eslint | The core linter package |
| @typescript-eslint/parser | A typescript parser for eslint |
| @typescript-eslint/eslint-plugin | A set of eslint rules for typescript |
| eslint-plugin-prettier | Plugin to allow prettier errors to display as eslint errors. |
| eslint-config-prettier | Disables eslint rules that conflict with prettier |
| prettier | The core prettier package |
Install our dependencies…
npm install --save-dev eslint \
  @typescript-eslint/parser \
  @typescript-eslint/eslint-plugin \
  eslint-config-prettier \
  eslint-plugin-prettier \
  prettier \
We will need to create three files, two configuration files and one ignore file. At the root of our project, create these files…
touch .prettierrc .eslintrc .eslintignore
Our .prettierrc is pretty simple. Feel free to add/remove prettier options as you wish
{
  "semi": true,
  "trailingComma": "all",
  "singleQuote": true,
  "printWidth": 120,
  "tabWidth": 2
}
And our .eslintrc file
{
  "parser": "@typescript-eslint/parser",
  "extends": [
    "plugin:@typescript-eslint/recommended",
    "prettier/@typescript-eslint",
    "plugin:prettier/recommended"
  ],
  "parserOptions": {
    "ecmaVersion": 2018,
    "sourceType": "module"
  },
  "rules": {
    "prettier/prettier": ["error", { "singleQuote": true }],
    "@typescript-eslint/explicit-function-return-type": "error",
    "@typescript-eslint/no-explicit-any": 1,
    "@typescript-eslint/no-inferrable-types": ["error", { "ignoreParameters": true }],
    "@typescript-eslint/interface-name-prefix": ["error", { "prefixWithI": "always" }]
  },
  "env": {
    "node": true
  }
}
To learn more about all the eslint config option, you can refer to their great documentation.
And finally our .eslintignore. This file works like a .gitignore. It tells eslint the files/directories to ignore from linting. If you don’t want to have an additional .eslintignore file you can tell eslint to use your .gitignore (the .gitignore use the same syntax as .eslintignore) by adding --ignore-path .gitignore when calling eslint in your package.json script.
Our .eslintignore…
node_modules/*
dist/*
coverage/*
Now that eslint is configured, we can add our scripts to a package.json to run the linter.
{
  ...
  "scripts": {
    "test": "jest",
    "coverage": "jest --coverage",
    "lint": "eslint",
    "lint-fix": "npm run lint -- --fix",
    "start": "ts-node src/index.ts",
    "build": "tsc"
  },
  ...
}
We added two additional scripts. One, lint, which will run the linter and prints the errors to the consolel. The other, lint-fix, which will run our lint script with an additional option --fix to auto-correct any errors that occur.
If we run npm run lint we will see a few errors in our console.
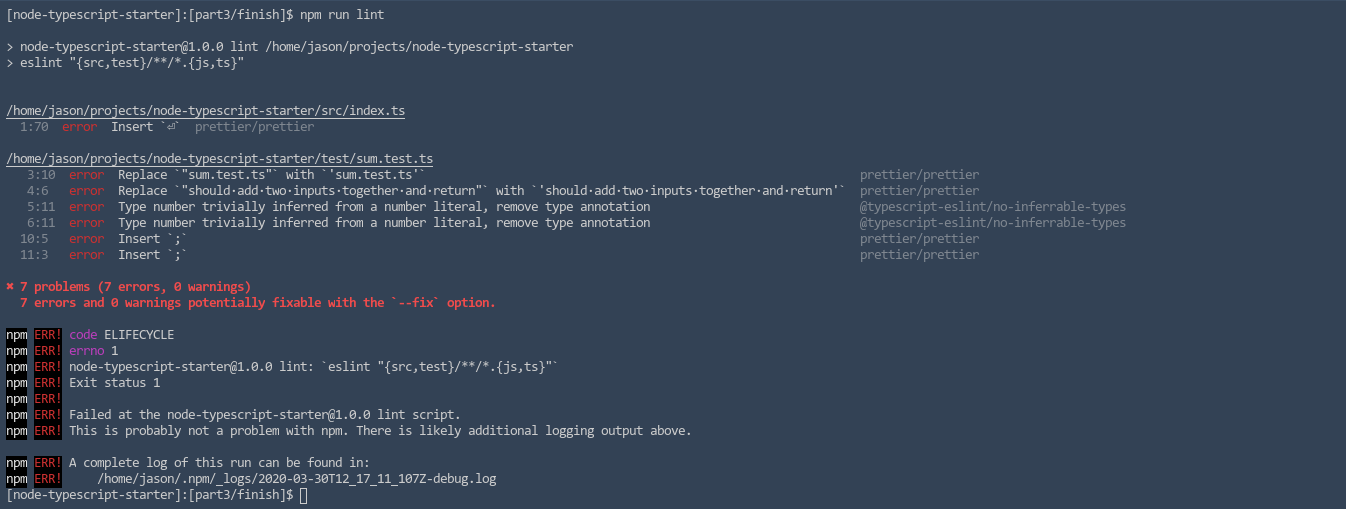
Lets examine the errors quickly. One of our default rules enforces a blank line at the end of each file. An error was thrown for index.ts saying we need a blank line. We can also see an error where we used double quotes instead of single quotes in our sum.test.ts as well as some missing semi-colons. Now we could manually go through and correct all these errors, or we can simply just run our lint-fix command. Lets do that.
npm run lint-fix
And if we run our lint command again, npm run lint, we’ll see all of our errors have been corrected and our code is formatted according to our eslint/prettier rules.
Git Hooks With Husky & Lint Staged
Lets take a look at how we can tie into git hooks with husky to run scripts pre and post git commands. We will setup husky to hook into pre-commit in order to run our linter before we allow a commit to be committed. We will also hook into pre-push to run our tests before we allow a push to a remote repository. Doing this will enforce our linting rules as well as ensure the code we are pushing doesn’t cause test breakage.
We can install husky as a dev dependency. We are also going to install a package called lint-staged. The lint-staged package will let us run our linter only on files added to the git staging area rather than our whole project.
npm install --save-dev husky lint-staged
Lets update our package.json file with our husky and lint-stage configurations. We will need to add two new properties, husky and lint-staged, at the root level of the object.
{
  ...
  "lint-staged": {
    "*.ts": "npm run lint"
  },
  "husky": {
    "hooks": {
      "pre-commit": "lint-staged",
      "pre-push": "npm test"
    }
  }
  ...
}
Lets make some changes to our src/index.ts to test our git hooks. We will update our index file to calculate the sum before returing the result. We will intentionally make a formatting error to error out on pre-commit. Update your src/index.ts.
export const sum: Function = (a: number, b: number): number => {
  const result: number = a + b // <== Leave out the semicolon to trigger error on commit.
  return result;
};
Now if we stage and commit our change, we should receive an error on the commit.
git add src/index.ts
git commit -m 'calculate result before returning'
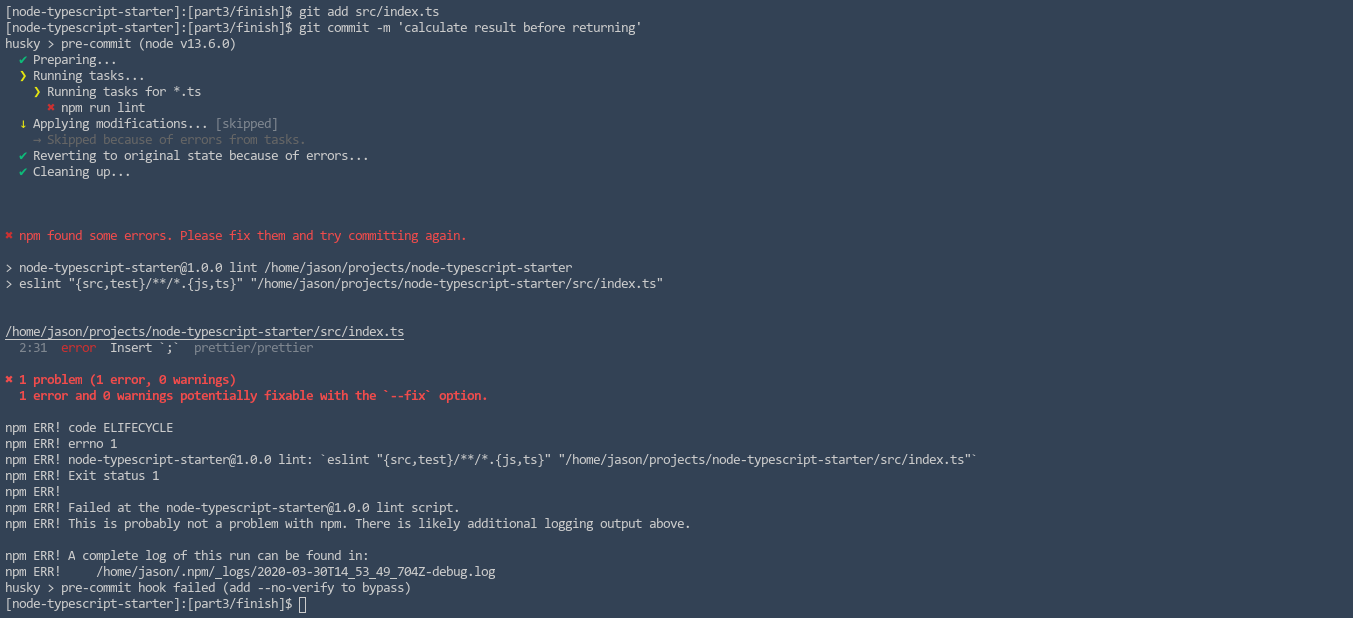
We can manually fix our errors or we can run npm run lint-fix. Since changes were made to our staged files by fixing our errors, we will have to restage our files then commit again.
npm run lint-fix
git add src/index.ts
git commit -m 'calculate result before returning';
Another option we have is to auto fix the errors on commit instead of erroring out. We would simply update our package.json file and change the lint-staged property to run npm run lint-fix instead.
{
  ...
  "lint-staged": {
    "*.ts": "npm run lint-fix"
  },
  ...
}
Remember to stage and commit all our changes to your repostiory.
git add .
git commit -m 'add eslint, prettier, husky, and lint-staged'
The completed github repository can be found here
More posts
- Setting Up a Node & TypeScript Project - Initial Setup
- Setting Up a Node & TypeScript Project - Configure Jest
- Setting Up a Node & TypeScript Project - Configure Tooling
- Setting Up a Node & TypeScript Project - Setup Express
- Setting Up a Node & TypeScript Project - Setup DB & ORM