Creating an Angular Dashboard Layout - Framing
Published on
If you ever search the for a dashboard layout you’ve probably come across fully themed out templates or a large library to construct your own dashboard but what if we only wanted just a simple structure where we could provide our own themed components. Something that wouldn’t required a large library import or excessively overriding css classes. Well, that’s what we’re going to build out next.
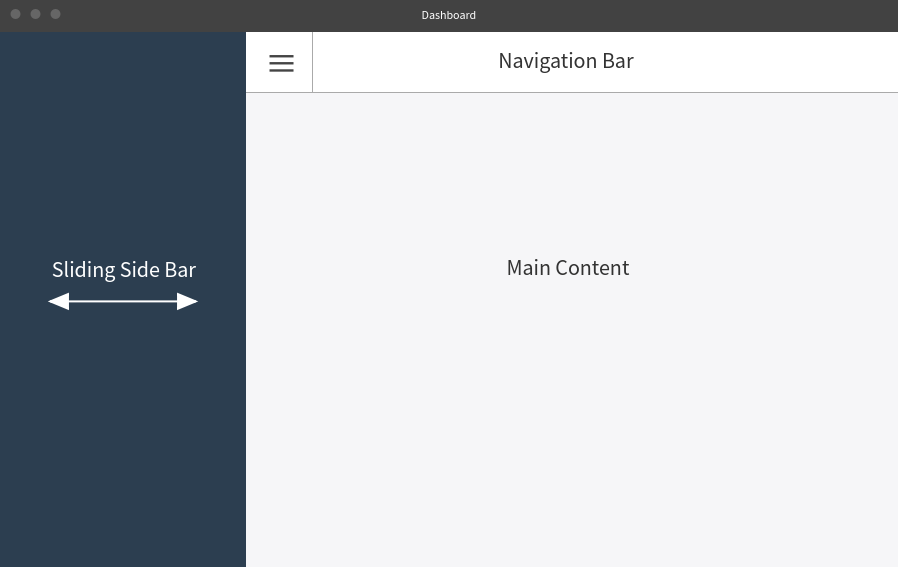
A dashboard layout usually consists of a side panel with a navigation bar and a main content section. If we break that down into Angular components, all we really need would be a single component for the layout structure. The structure is essentially just div containers with subsections for the different components. We then could use a service to manipulate the size/position of those containers.
Over the next couple posts I’m going to be putting together this simple dashboard layout using Angular. We will start by putting together the framing component and later in the subsequent posts we will go through creating custom navigation components to use with our framing.
Here is a rough idea of what we re looking to build:
Prerequisites
The starter github repository can be found here
Setting Up Our Angular Project
We are going to use the Angular CLI to create our projects. We will also use SCSS for our styling.
Let generate a new project…
ng new angular-dashboard-template --style=scss --routing=true
Before we get into building our layout we going to add some general styling. It is more or less a light reset of some html elements, adding some fonts, and icons. Lets update our root style.scss
@import url('https://fonts.googleapis.com/css2?family=Source+Sans+Pro:wght@200;400;600;700&display=swap');
@import url("https://cdnjs.cloudflare.com/ajax/libs/font-awesome/5.13.0/css/all.min.css");

$background: #F6F6F8;
$font-color: #FFFF;

html, body, ul, p, h1, h2, h3, h4, h5, h6, blockquote {
  margin: 0;
  padding: 0;
  box-sizing: border-box;
  font-family: 'Source Sans Pro', Arial, Helvetica, sans-serif;
}

html {
  font-size: 16px;
}

body {
  background: $background;
}

a {
  color: $font-color;
  font-weight: 400;
  text-decoration: none;
}
Creating Our Core Module
We will then create a core module and import it into our root app module.
ng generate module core
Now we need to create our component and service in our core module…
ng generate component core/layouts/dashboard-layout
ng generate service core/layouts/dashboard-layout/services/side-panel
We need to update our core module to exports our new component and service so we can use them.
import { NgModule } from '@angular/core';
import { CommonModule } from '@angular/common';

import { DashboardLayoutComponent } from './layouts/dashboard-layout/dashboard-layout.component';
import { SidePanelService } from './layouts/dashboard-layout/services/side-panel.service';

@NgModule({
  declarations: [
    DashboardLayoutComponent
  ],
  imports: [
    CommonModule
  ],
  providers: [
    SidePanelService
  ],
  exports: [
    DashboardLayoutComponent
  ]
})
export class CoreModule {
And finally import our core module into our app module…
import { BrowserModule } from '@angular/platform-browser';
import { NgModule } from '@angular/core';

import { AppRoutingModule } from './app-routing.module';
import { AppComponent } from './app.component';
import { CoreModule } from './core/core.module';

@NgModule({
  declarations: [
    AppComponent
  ],
  imports: [
    BrowserModule,
    AppRoutingModule,
    CoreModule
  ],
  providers: [],
  bootstrap: [AppComponent]
})
export class AppModule { }
Creating Our Model Classes
We will need to create a few models for our layout as well. We will create a class to hold our layout configuration options and two enums, one to model the panel state and the other for panel position (left or right side). Lets create our models…
mkdir src/app/core/layouts/dashboard-layout/models

touch src/app/core/layouts/dashboard-layout/models/dashboard-layout-configuration.model.ts \
    src/app/core/layouts/dashboard-layout/models/side-panel-state.enum.ts \
    src/app/core/layouts/dashboard-layout/models/side-panel-location.enum.ts
Our DashboardLayoutConfiguration model…
import { SidePanelPosition } from './side-panel-position.enum';
import { SidePanelState } from './side-panel-state.enum';

export class DashboardLayoutConfiguration {
  constructor(
    public sidePanelPosition: SidePanelPosition,
    public initialSidePanelState: SidePanelState
  ) {}
}
Our SidePanelPosition enum…
export enum SidePanelPosition {
  LEFT = 'panel-position-left',
  RIGHT = 'panel-position-right'
}
And our SidePanelState enum…
export enum SidePanelState {
  OPEN = "open",
  CLOSE = "close",
  COLLAPSE = "collapse"
}
Our enum values are strings that will be associated with CSS classes and will be applied to the framing elements with [ngClass] to determine the framing position and panel state. This might sound a little confusing but will make more sense when we get to the HTML of the dashboard layout.
Creating Our Side Panel Service
The key that make this work is the side panel service. It holds the global panel state and will allow us to interact with our side panel from other components. The state change events are driven by an RxJS BehaviorSubject which will emit panel state changes to it’s subscribers. If you aren’t familiar with RxJS, you can learn more here.
And our side panel service…
import { Injectable } from '@angular/core';
import { BehaviorSubject, Observable } from 'rxjs';
import { SidePanelState } from '../models/side-panel-state.enum';

@Injectable({
  providedIn: 'root'
})
export class SidePanelService {
  private _panelState: SidePanelState;
  private _panelStateSource: BehaviorSubject<SidePanelState>;
  public panelStateChanges: Observable<SidePanelState>;

  constructor() {
    this._panelState = SidePanelState.OPEN;
    this._panelStateSource = new BehaviorSubject<SidePanelState>(this._panelState);
    this.panelStateChanges = this._panelStateSource.asObservable();
  }

  public changeState(state: SidePanelState): void {
    this._panelState = state;
    this._panelStateSource.next(this._panelState);
  }
}
The service has two public interfaces, the panelStateChanges Observable to allow other components to subscribe to the state changes and changeState() method which allows us to change the state of the panel.
Creating Our Dashboard Layout Component.
Now we can build our dashboard layout component. The component is very simple, consisting of a set of divs for our columns and ng-content elements for our dynamic content.
<div class="container" [ngClass]="configuration.sidePanelPosition">
  <div class="left-column"[ngClass]="currentPanelState">
    <ng-content select="[container=sidePanel]"></ng-content>
  </div>
  <div class="right-column">
    <div class="navigation-bar">
      <ng-content select="[container=navigationBar]"></ng-content>
    </div>
    <div class="main-content">
      <ng-content select="[container=mainContent]"></ng-content>
    </div>
  </div>
</div>
For positioning and structuring our layout we are useing flexbox. We will also be using a CSS animation over using Angular’s animation library since our animation isn’t very complicated. Our SCSS will look like this…
@mixin sticky {
    position: -webkit-sticky;
    position: sticky;
}

.container {
    display: flex;
    flex-direction: row;
    height: 100vh;

    &.panel-position-left {
        flex-direction: row;
    }

    &.panel-position-right {
        flex-direction: row-reverse;
    }

    .left-column {
        @include sticky();
        top: 0;
        transition: width 0.3s;
        overflow: hidden;

        &.open { flex: 0 0 350px; }
        &.close { flex: 0 0 0px; }
        &.collapse { flex: 75px; }
    }

    .right-column {
        display: flex;
        flex-direction: column;
        flex-grow: 1;
        overflow-y: auto;

        .navigation-bar {
            @include sticky();
            top: 0;
            z-index: 100;
        }
    }
}
And our component class…
import { Component, OnInit, OnDestroy, Input, HostListener } from '@angular/core';
import { Subject } from 'rxjs';
import { takeUntil } from 'rxjs/operators';
import { DashboardLayoutConfiguration } from './models/dashboard-layout-configuration.model';
import { SidePanelPosition } from './models/side-panel-position.enum';
import { SidePanelService } from './services/side-panel.service';
import { SidePanelState } from './models/side-panel-state.enum';

@Component({
  selector: 'app-dashboard-layout',
  templateUrl: './dashboard-layout.component.html',
  styleUrls: ['./dashboard-layout.component.scss']
})
export class DashboardLayoutComponent implements OnInit {
  @Input()
  public configuration: DashboardLayoutConfiguration;

  private _subscriptionsSubject$: Subject<void>;
  public currentPanelState: SidePanelState;

  constructor(private _sidePanelService: SidePanelService) {
    this._subscriptionsSubject$ = new Subject<void>();
    this.configuration = new DashboardLayoutConfiguration(SidePanelPosition.LEFT, SidePanelState.OPEN);
    this._sidePanelService.changeState(this.configuration.initialSidePanelState)
  }

  ngOnInit(): void {
    window.dispatchEvent(new Event('resize'));
    this._sidePanelService
      .panelStateChanges
      .pipe(takeUntil(this._subscriptionsSubject$))
      .subscribe((state: SidePanelState) => this.currentPanelState = state);
  }

  @HostListener('window:resize', ['$event'])
  onResize(event) {
    const width: number = window.innerWidth;
    if (width < 768)
      this._sidePanelService.changeState(SidePanelState.CLOSE);
    else if (width < 991)
      this._sidePanelService.changeState(SidePanelState.COLLAPSE);
    else
      this._sidePanelService.changeState(SidePanelState.OPEN);
  }

  ngOnDestroy(): void {
    this._subscriptionsSubject$.next();
    this._subscriptionsSubject$.complete();
  }
}
We setup an @Input to allow us to pass our layout configuration to our DashboardLayoutComponent. We also inject our SidePanelService and subscribe to the side panel state changes. In our HTML we use Angular’s [ngClass] attribute directive to apply classes to our container and left column to set the side panel position and width.
Since we subscribed to the panelStateChanges of our service, differenct classes will be applied to our structure when we get a new panel state. We’ve also declared CSS classes for the three panel states .open, .close, and .collapse with different widths.
Updating Our App Component
Now we can use our dashboard layout component in our Angular application. We will update our root app component, using placeholders for our dynamic content for the time being. In the next post we will create components to replace these placeholders.
<app-dashboard-layout [configuration]="configuration">
  <div container="sidePanel">Side Panel</div>
  <div container="navigationBar">Navigation Bar</div>
  <div container="mainContent">
    <router-outlet></router-outlet>
  </div>
</app-dashboard-layout>
And our app component class where we create our initial DashboardLayoutConfiguration instance.
import { Component } from '@angular/core';
import { SidePanelState, DashboardLayoutConfiguration, SidePanelPosition } from './core';

@Component({
  selector: 'app-root',
  templateUrl: './app.component.html',
  styleUrls: ['./app.component.scss']
})
export class AppComponent {
  public configuration: DashboardLayoutConfiguration;

  constructor() {
    this.configuration = new DashboardLayoutConfiguration(
      SidePanelPosition.LEFT,
      SidePanelState.OPEN
    );
  }
}
Stackblitz Result
Now we have a wire frame for a dashboard layout. Below is a live demo of our layout component in a Stackblitz. There are three buttons in the navigation bar to toggle between the three side panel states.
Next we’re going to be creating custom styled components to use with our layout.
The completed github repository can be found here
More Posts
- Creating an Angular Dashboard Layout - Framing
- Creating an Angular Dashboard Layout - Theme
- Creating an Angular Dashboard Layout - Content Grid